Wednesday, May 26, 2010

Local Copic Class Questions Answered

Hey Everybody, since I'm directing people to my Blog for information about my local Copic Markers Classes, I wanted to clarify something here. The most common question I'm getting is "Do you have to be able to draw your own images?".


No, you do not. You use any Stamped Image-Rubber, Acrylic, Digital or hand drawn.

You do not need to be "uber" artistic to do this type of art. Just think of it as a much more sophisticated version of coloring in your coloring books. If you liked (or like) to do that, you'll love Copic Marker Coloring.

Here's an example of a really quick, simple but very cute card I did in about 10 minutes.

Friday, May 14, 2010

Caardvarks Blog Challenge

I have never participated in a challenge. So, I thought I would give it a try. Here is a card using their layout and a Tiffany Doodles Digi Sketch. The patterned paper is Front Porch series from My Minds Eye. I used Copic colors YG67, YG63 & YG03 on the pocket and E53,E55,E57 & E59 on the mouse. The cheeks and ears are R21 & R22. I know, I know, you've seen me use this one really recently. I just think this is the cutest image ever. Lot's of Love!

Tuesday, May 11, 2010

Copic Cards for my Class

The 3rd post in one day. My husband is gone fishing. So, I don't have to feel guilty about sitting at the computer and ignoring him. Ha! I really needed to get some current cards on my blog so that some potential clients can look at my work.


Here are some recent cards I made up to use as samples for my upcoming classes.This is a mystery Digi Image from I don't know where. I printed it in three different sizes and after using Copics to color, I cut them out.

Another Digi Image from Tiffany Doodles. I love this little guy. I made 7 different cards using this image.


Another Mouse in Pocket.


My Copic Swatch Book

Two posts in one day-wow! I am definitely going to be offering Copic classes in my area. I'm working out all the details. I've found a place to hold them. I'm busy making up my lesson plans and sample work to pass around in class. I've been polling all my friends and I'm going to hold them on Tuesday nights every other week. My husband doesn't understand why there is so much work involved in getting ready for the classes. He says just teach them something. Well, call me crazy, but having been to other Copic Classes and walking away disappointed, I want to make sure I really teach the girls something. I want them to leave feeling that they actually got their money's worth. I've completed my SWATCH Book for them to look at. That is what I'm going to post today. Here is how I did my Copic Swatch/Sample book. I purchased a simple Sketchbook with Heavyweight paper-70 sheets. I can write in it or tape my samples on the pages. I found you can't use your Copics on it cause they bleed through really badly. I pasted my True Copic Color Chart Pages on the first two sheets. I just make sure I add any colors I buy. I already have way too many pages to scan them all, so here is a sampling of how I did my book. I didn't decorate the book all fancy as I really care more about what is inside. I find all that fancy outer paper and stuff gets torn up too quickly anyway. I cannot believe just how invaluable a tool it is. I refer to it every single time I color something. If you haven't made yourself one, you really really should.

I started my book with Skin Tones. Then there is a page devoted to each type of hair color; brunettes, blonde's, blacks & reds. Here is a sample of one of those pages.

I then went into pages on doing specific colors; like this Black page and Red page..
I also have pages on doing Whites, Lilacs, Blues, Denims, Greens & Creams.

Next, comes a couple of pages on Shadowing: Clothing and other objects.

Then I move onto Landscapes, Trees & Leaves.
I have a couple of pages of how to color Woods of all kinds.
Then Stones, Bricks, Rocks & Pebbles.

I have a couple of pages on how to do Oceans, Lakes & Ponds.
I have a section of how to do Eyes & eye highlights.
Then a page on How to Do Glass and Metals, Fur, Misc Techniques using the Colorless Blender. How to do Translucent objects, like overlaying balloons.

Pages on doing Vintage and Pastels and Watercolor (all with Copics of course).

I then have another Techniques section where I have how to Flicking, Blending, Feathering, Scribbling, ET.

Then I have a Spotlight Section that I will add to as Marianne Walker spotlights colors.

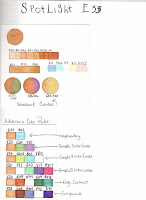
Finally, another section on "Advanced Skin Tones". Obviously, I wish I could have grouped some things together, but that is one drawback of this not being a ringbinder. You can't take pages out and move them around after they are done. But I know where everything is since I put it all in there.
On each page, it is important to record certain things. For instance, the type of paper you did the sample on, the exact Copic colors used, and credits to someone else that you learned it from for future reference. I even have a page in the very back with 6 samples of the same stamped, colored image on 6 different types of paper for comparison.

Okay, I hope this helps someone out there. I know when I started learning about Copics, even though I was able to find some limited examples of people color swatch books, I didn't feel they were detailed enough. I felt lost. That's why I gave so much detail in this post.
Tomorrow I will post some sample artwork I'm going to use in my classes.

A Day at the Zoo

Hey All,
I've been busy doing stuff like going to the St. Louis Zoo- too busy to post on my blog. Ha! So, I thought today I'd share a few amazing pics from the zoo. I just love animals. I would prefer getting these pics of animals in the wild, but let's be real. It's just not going to happen for most animals. So, I'll pretend they are not all behind bars and glass windows. I stuck my super zoom lens on my camera before I left and I am so glad I did. I was able to get some really amazing shots, even through glass. Here are just a couple of my favorites.


I love the butterfly house. It's so quiet and 'gentle'.


My absolute favorite though is BIRDS. I just love how much of a variety there is. Our creator really put some serious thought into the Birds. They have such expressions, colors & sense of humor. I could watch them all day long.
Look at the eyelashes on this one.
This Kookaburra has the biggest head. He was hilarious.

I have no idea what this was. She resembles the Guineas that we have on our property. I do remember she had Peafowl in her title.

This Toucan kept cleaning his bill. He would dip it in the water and then rub his foot all along it.
There is a Penguin House at the zoo that is like 45-50 deg inside. They are beautiful birds, but the smell in there is tooooo much for me. It smells like rotted fish (I'm sure that what it was too).

Check out those razor looking claws. Whoa!

Had to throw an elephant in. Get it! Throw an elephant! No way!

These two Tigers were playing and I just kept snapping shots and I got this really cool one of him. Love it!
I hope you all get to go observe some animals this summer. As you all know, I have lot's of my own animals to watch. And some of you may not know that right across the highway from our place, there is an Exotic Animal Farm. It is not open to the public, but we do favors for each other, so we can go any time we want. Some of our friends & family have been fortunate enough to go with us. He raises his animals to sell to the Zoos. He has Lions, Bears, Camels, Monkeys, Deer, Elk and lot's of weird, unusual goats and birds. He has animals that are found only in Madagascar. No hissing cockroaches though. (Zoo joke) We hear the Lion roaring every single day. As the crow flies, he's only about 2 city blocks away, so the sound is very clear. You might think that is scary, but we love it. It is so beautiful. My husband helped them build the cage system they are kept in, so we are pretty confident they are well contained. No accidental escapees yet!! Okay, enough about the animals. Later!